"High/Low" We employ a design sensibility we call "high/low". It reflects our belief that not all design decisions need be expensive to be beautiful. Instead, pick your spots and mix more expensive fixtures and materials with more economical ones. One of the best times to employ this idea is with tile. Tile selections can easily become one of the most expensive materials in a project, and having a "high/low" strategy when making your selections can not only save money but deliver some compelling design solutions. The "High" or Pick a Spot for the Pop When it makes sense, we may spend more on a tile we love. Smaller featured areas, such as a powder room floor or a kitchen backsplash, are perfect places to splurge with a more expensive tile selection. The price difference between a simple tile at $10/SF and a gotta-have-that-tile-or-I'm-gonna-melt tile that is $30SF might initially seem like a big spread. But do the math. A simple, main level powder room, for example, may only be 7'x3'. That's 21 SF of floor tile. In this example, the price range of our two tile options would be $210 to $630, or $420. Yes, the more expensive tile option costs 300% more, but in relative dollars, $420 is a modest amount in an overall project budget. The "Low" or Play to the Base To keep tile costs down - or the "low" - we often use inexpensive field tile [a 4x10 subway tile in this bathroom] as a tile base. Instead of paying for more expensive cove base or a decorative bullnose, we use a larger field tile. The unique and interesting shapes of decorative tile or cove base come at a price, and are commonly charged by the piece. > See more images of this project In our previous powder room example, we would need approximately 17 LF of tile base [20' LF minus 3' for door and casing]. A 6" cove base at $5/piece would cost $170. Using the 4x10 subway tile [$2.50/SF], however, would cost approximately $15. That is a $155 difference and goes a long way to offset the "high" cost of the more expensive floor tile. To Cap it All Off Using a less expensive 4x10 subway tile as a tile base poses one additional challenge. As it was not intended to be used as wall base [it's intended to be topped by another piece of tile], it lacks a factory finished edge. Without another course of tile, you are left with a rough, unfinished edge. What to do? Enter the metal transition strip! At only $1/FT, it's an economical solution that not only covers the rough, unfinished edge of the field tile, but also adds a clean and durable surface. Want even more? The metal transition strips come in a variety of sizes, profiles, colors and finishes, from chrome to satin and from brass to black. PLAYING THE FIELD A simple and inexpensive field tile serves as a wall base capped by a metal transition strip - it's a favorite solution of ours as it's a great way to stretch your tile allowance dollars while adding a little flair. We love that combination! One More Use
We've applied the same technique in other locations as well [you can see it in the first image capping off the mosaic tile backsplash]. We have even used it at a door threshold between hardwood flooring and floor tile. It's a simple, clean detail between two different materials that can be a little rough when laid up next to each other. At the door threshold, we turned the metal strip on end so that you only see the thin edge, which is a very similar dimension to a grout joint line. Given the tendency of wood and tile to move and settle at different rates, a grout joint in this location will crack and break apart over time, leaving a crumbling joint.
2 Comments
For a young family of five, an upper level addition was an obvious design opportunity. A less obvious design solution, however, was how to make navigating the new stairway safer for the three young kids, who often found their way downstairs during the night or early morning. BEING NOSY Some design solutions are obvious, others are more subtle. Changing the wood species of the stair nosing at the top of the steps and landing qualifies as a subtle solution. The First Step
For all of us, the most dangerous moment descending the stairs is the first step. Not seeing the stair nosing or tread can be scary, especially for little ones or the elderly. Being able to see all of the floor level changes clearly before entering the stairway dramatically increases safety. > See more images of this project To address this concern in a subtle way, we altered the wood species of the stair nosing to differentiate it from the hallway. A clear, blonde maple hardwood makes up the flooring field, and a red oak stair nosing provides a simple yet obvious delineation between hallway and stairs. Source of the Solution It's a solution pulled from my experience as a commercial architect. When designing public buildings, any change in floor level is required to be highlighted by a change in color or texture. The edge of a train platform or the curb at an intersection are prime examples. Rather than painting the nosing safety yellow, we simply altered the wood species to make the new space safer for everyone. Here, the first step in the stair run and at the landing, red oak stair nosing contrasts with the blonde maple tread. Design is not always about aesthetics. In fact, I have found that pragmatic, nuts and bolts design solutions can be as impactful as beautiful tile or countertops. Making a home "work" is often about solving less glamorous, real-world concerns, such as safely descending a beautiful new staircase. One of the most wonderful advances in lighting is the flexibility and opportunity offered by LEDs. Not only do they use a fraction of the energy, they don't get hot, they are dimmable, and they are smaller and flexible.
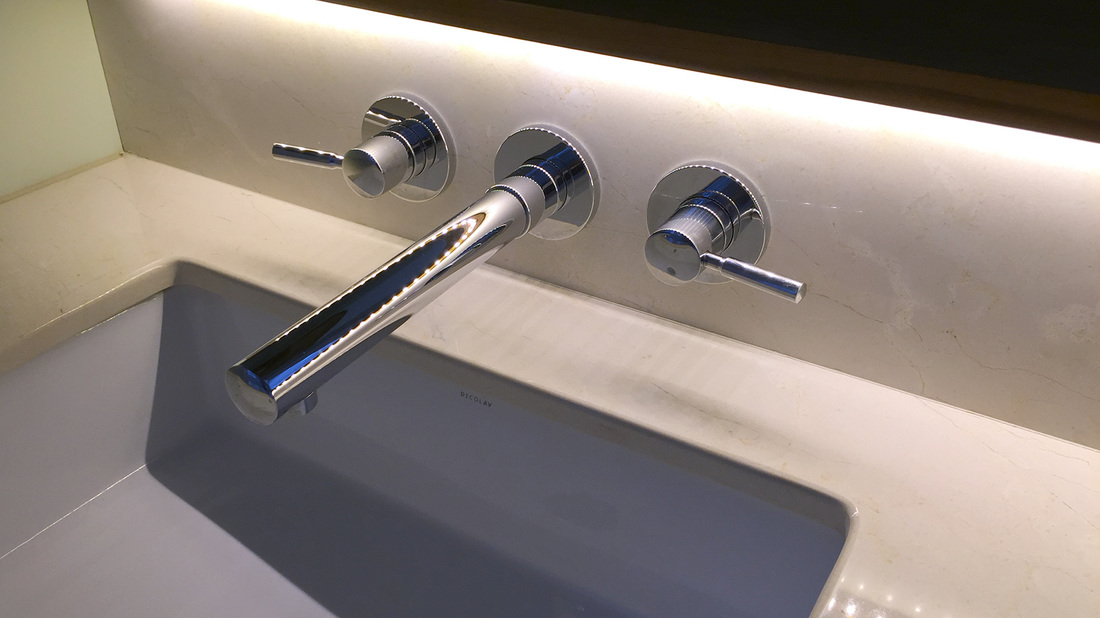
Here we have installed an adhesive strip of LED diodes into a routed channel in the walnut ledge above the countertop. The LEDs can be cut to any length and use only 1.4 watts/foot. It's a perfect application that's both invisible and acts as a grown up night light! Another similar application is to route a channel in the bottom of a wood handrail, where the LED lights illuminate the stairway at night. In any application, this solution is most easily done when the walls are open, offering access to run low voltage wiring. |